tutorial for using the hot wire plotter
index
- turning on the plotter
- checking the cutting file
- checking the cutting path
- preliminary operations
- moving the wire
- securing the material
- starting position of the wire
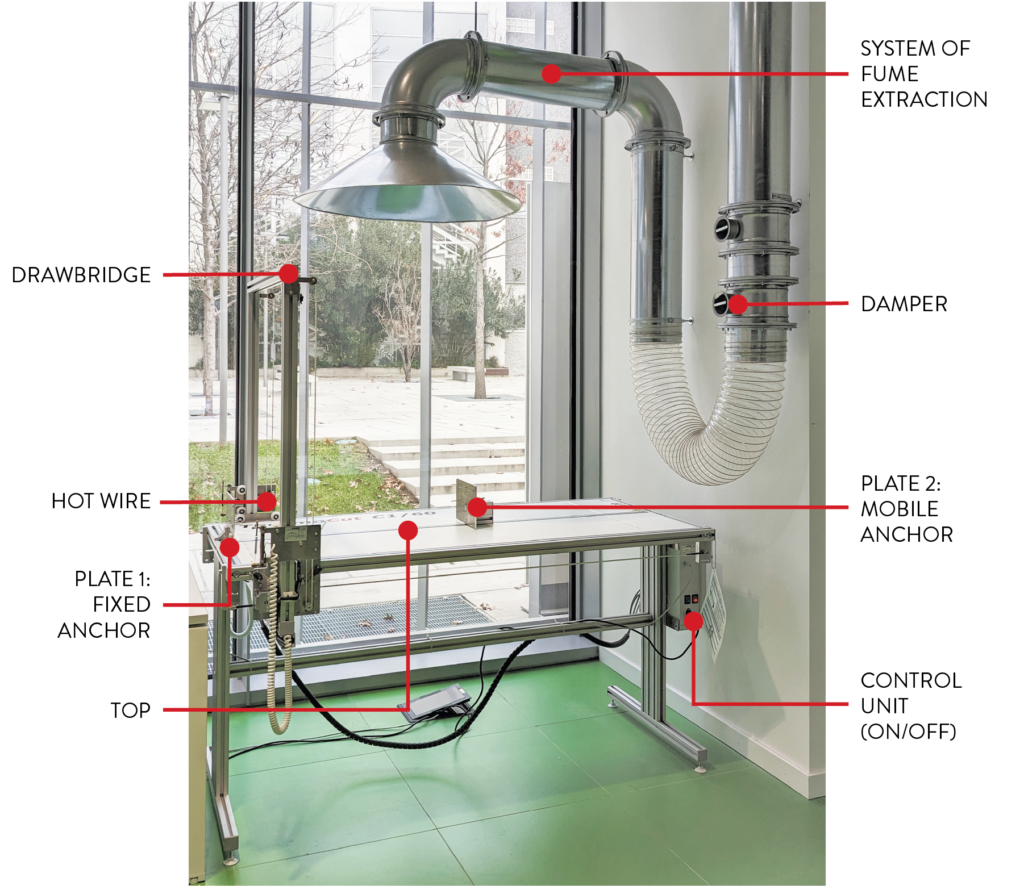
- turning on the fume extraction system
- cutting process
- at the end of the cut
- advanced settings – staff operators only
- prohibitions and regulations
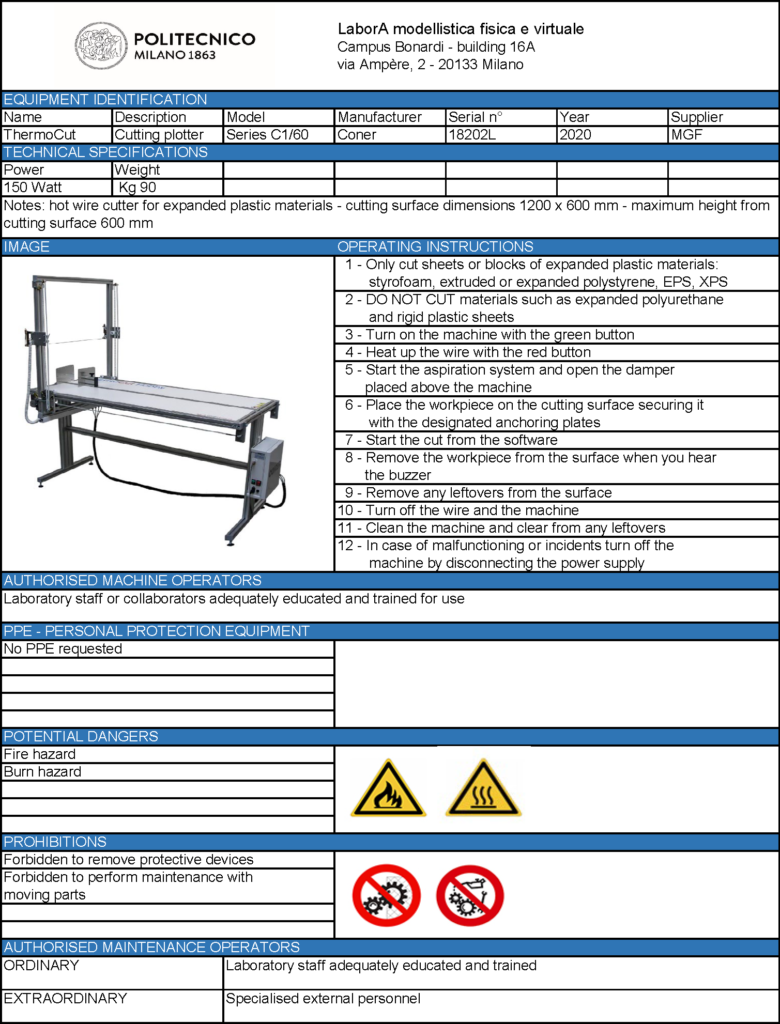
- machine sheet
- instructions manual
- tutorial for using the hot wire plotter – printable version
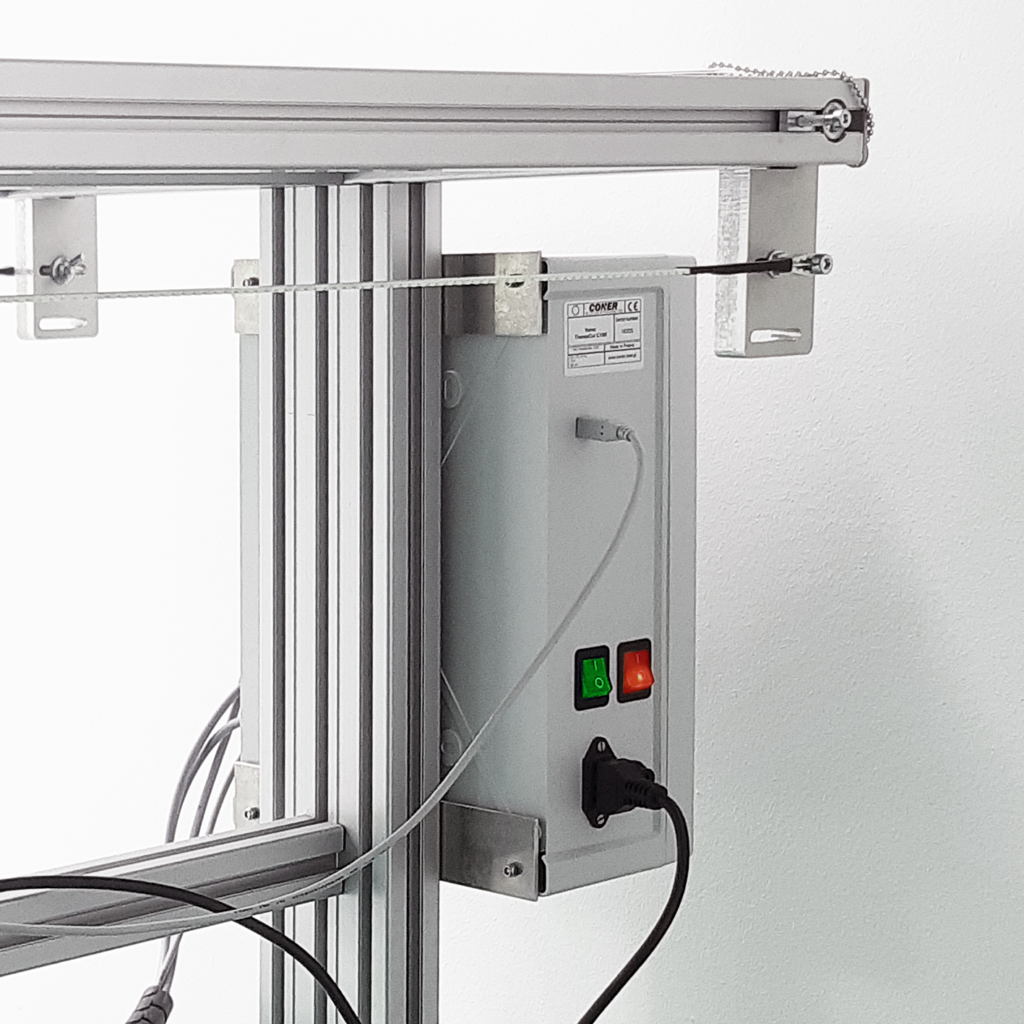
1. turning on the plotter
Press both switches on the control unit on the right side of the machine: red turns on the machine, green heats up the wire.
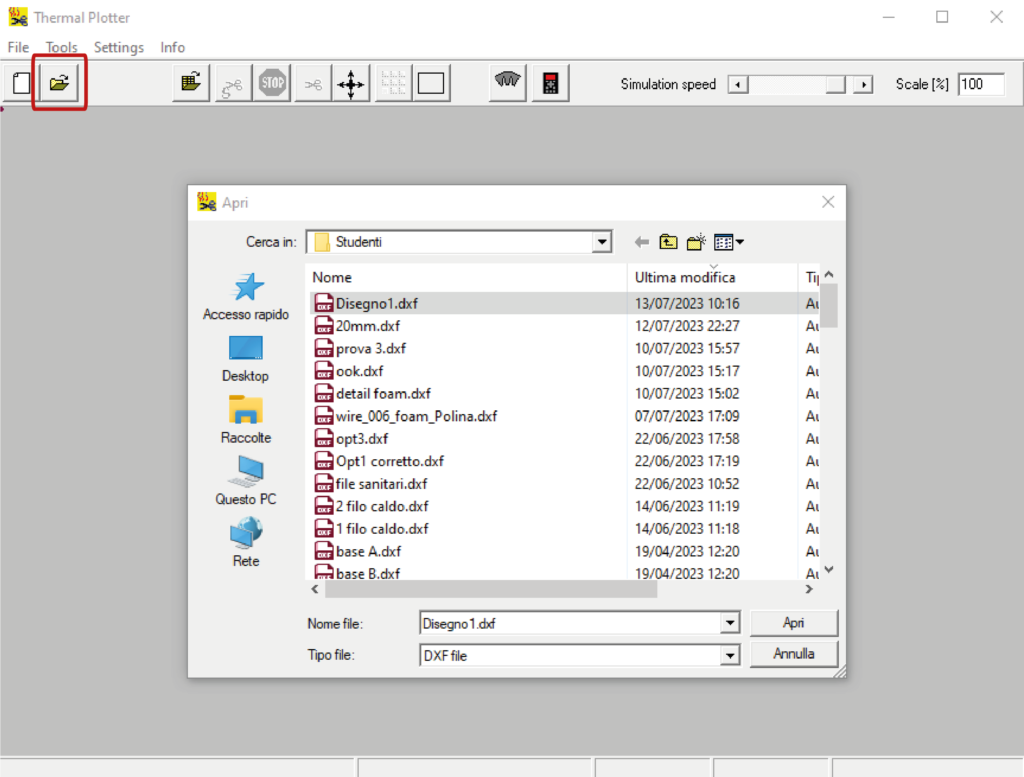
2. checking the cutting file

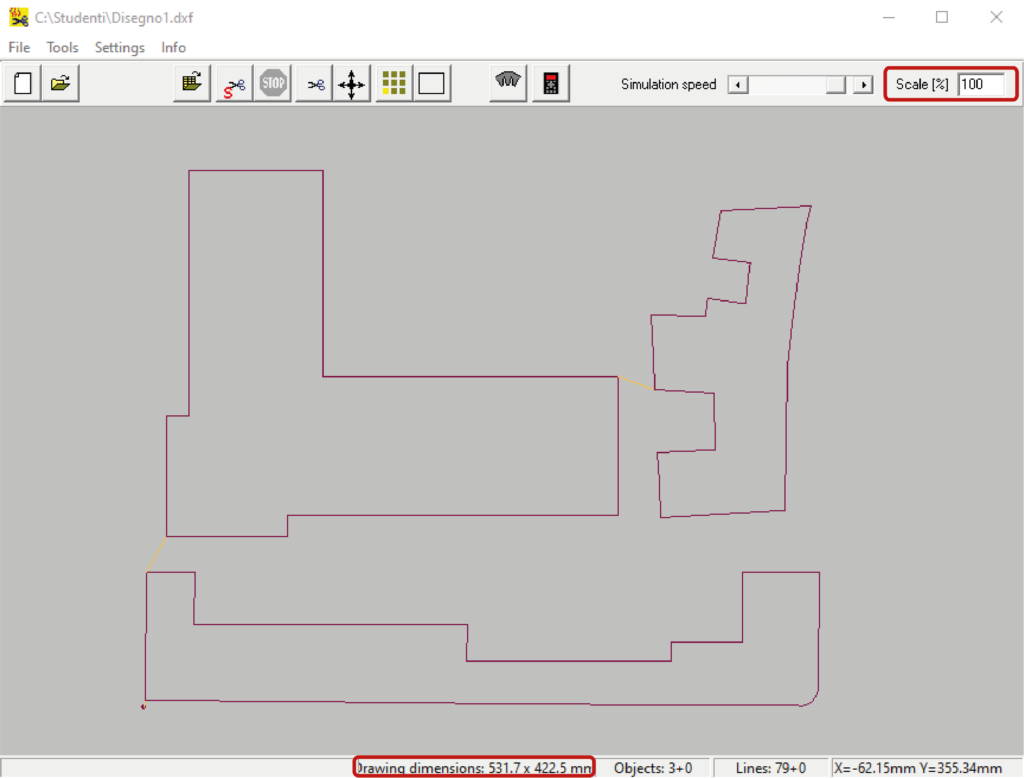
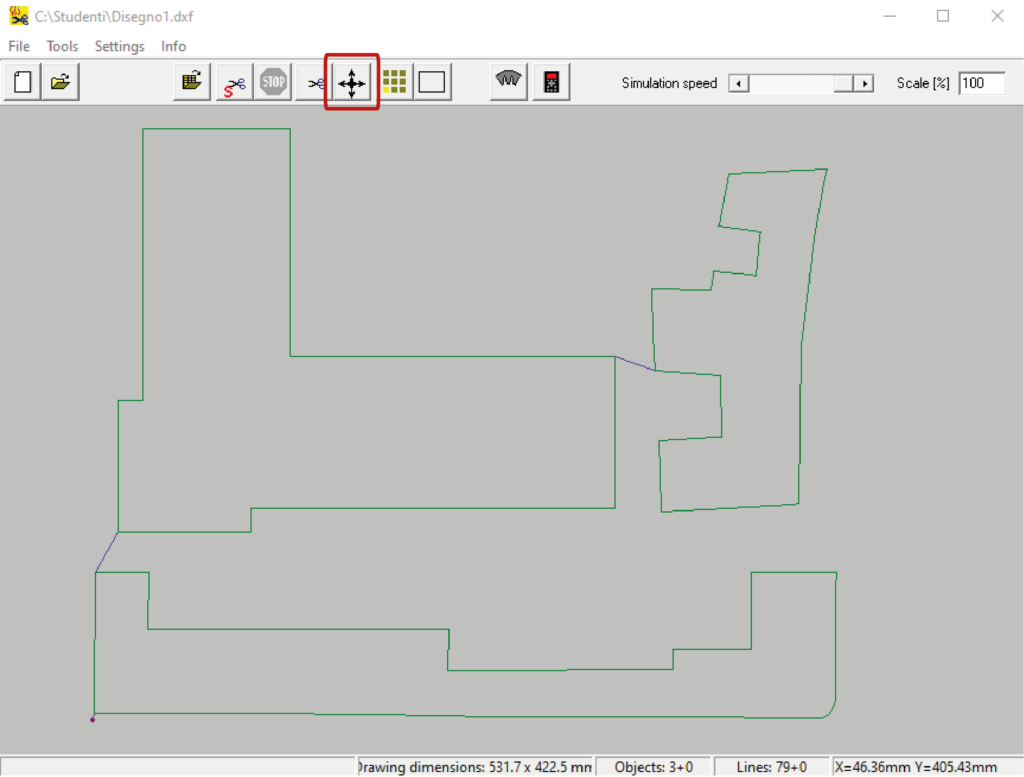
The cad file must be saved in .dxf 2000 format, making sure that there are no overlapping lines and other lines or figures that shouldn’t be cut (see hot wire cutting page).

Make sure that the dimensions shown in the bottom bar Drawing dimensions correspond to the size of the total dimension of the desired pieces; if not, change the scale in the designated box Scale (%) on the top right.
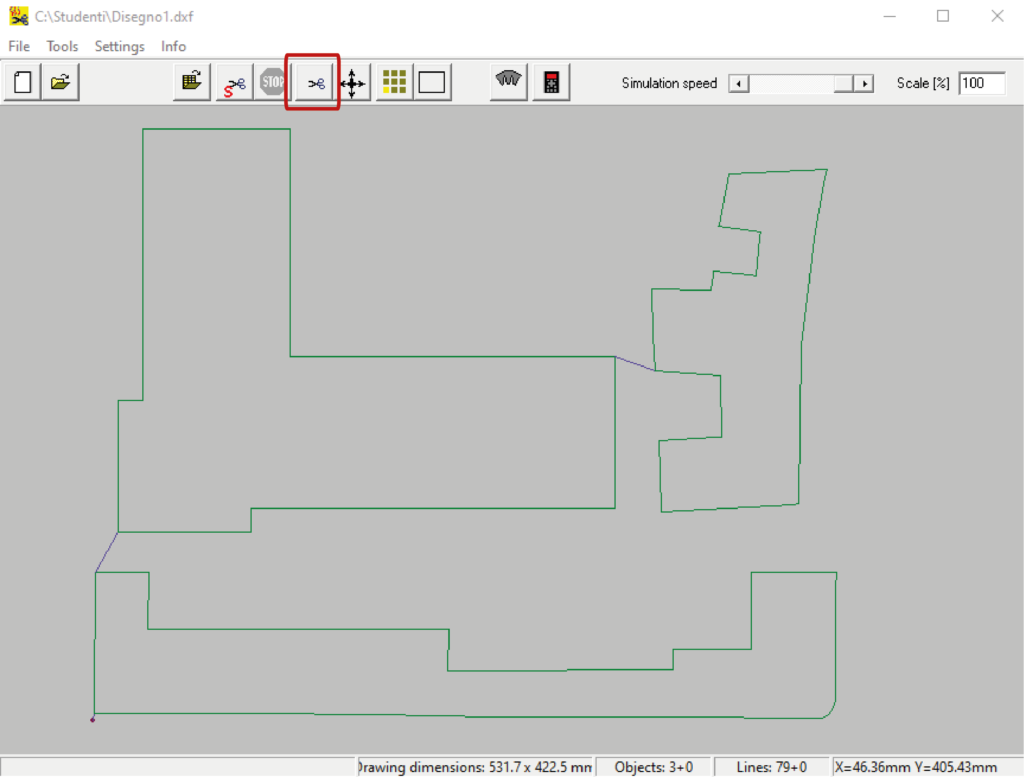
3. checking the cutting path

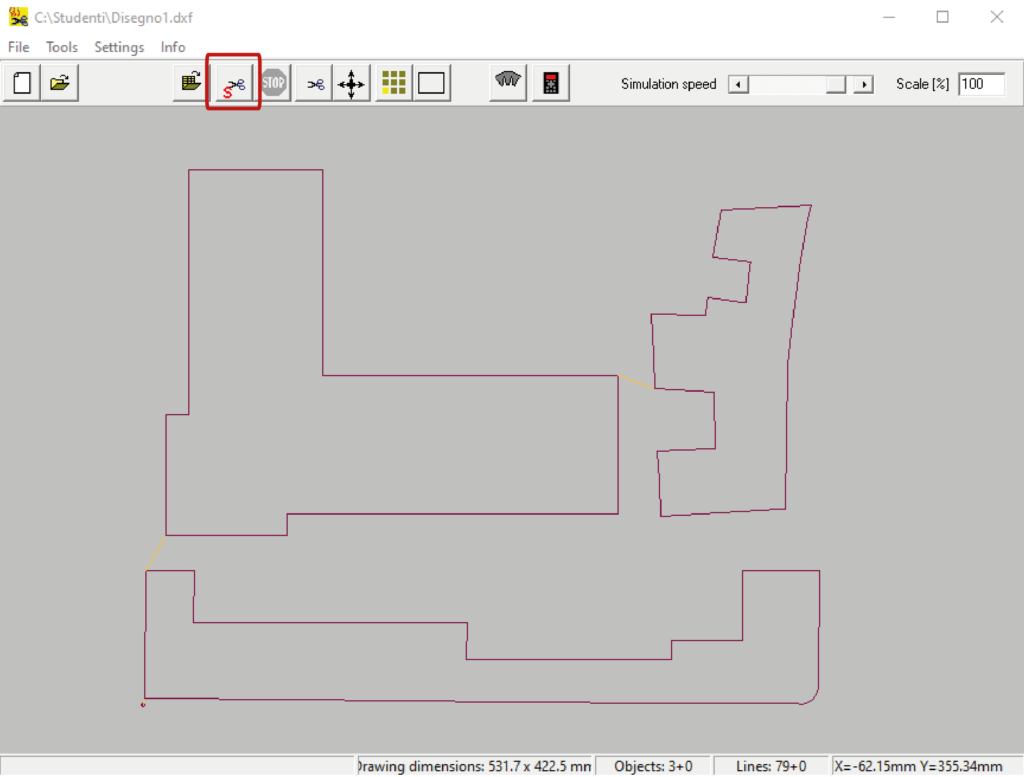
During the simulation, the movement of the wire is represented by the progress of a blue line. If necessary, adjust the speed by changing the parameters in the designated box Simulation speed on the top right, even during the simulation.
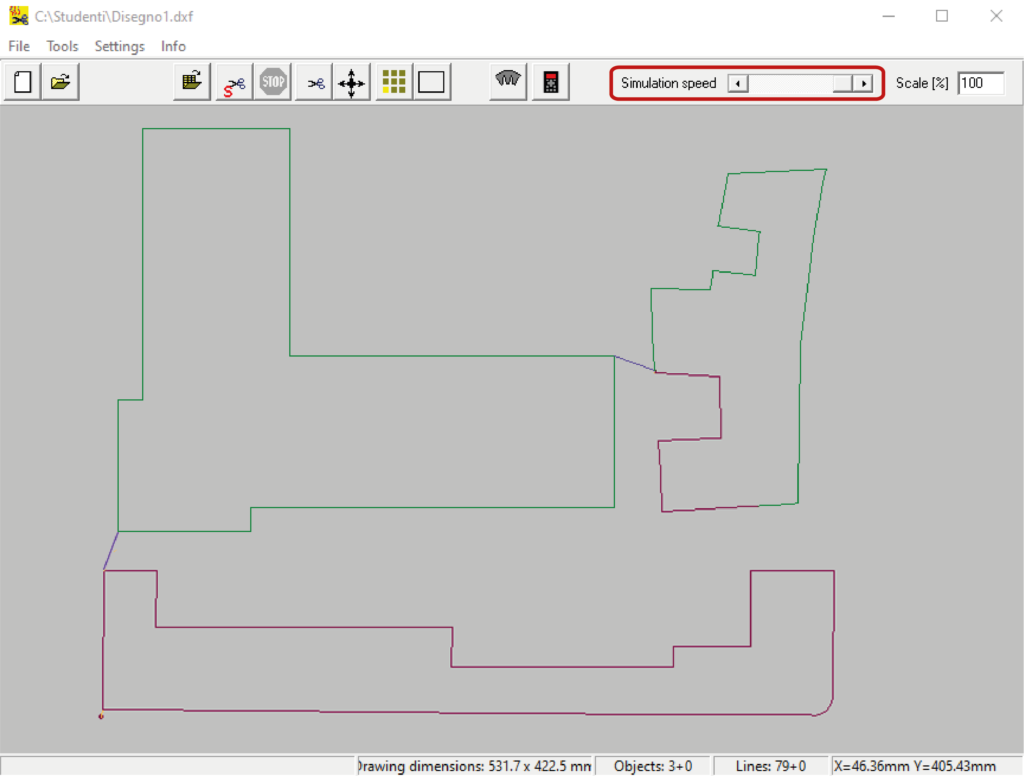
The preview of the cutting path allows you to verify that there are not multiple passes on the same line that would increase the thickness of the cut. If this error occurs, ask for staff support.
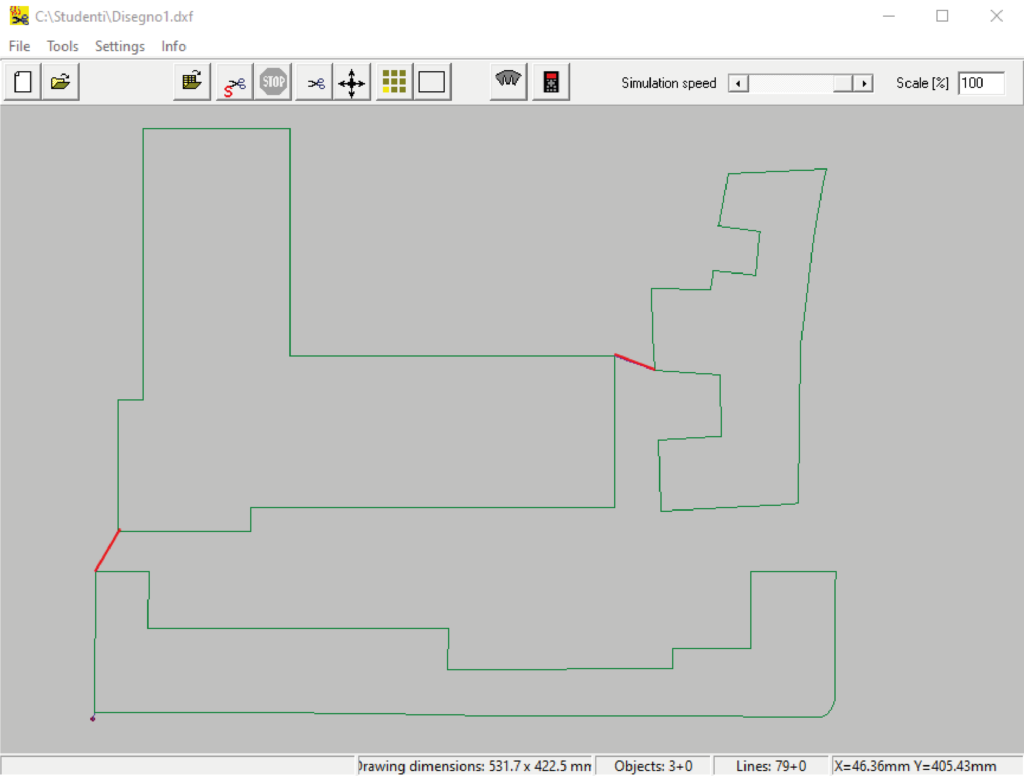
The connecting lines between the different shapes (red line in the previous picture) are automatically generated by the software Softcut and can be retraced several times.
4. preliminary operations
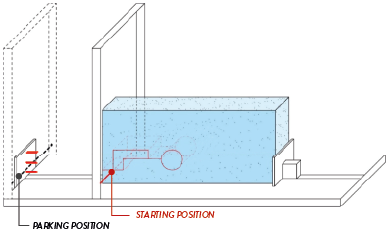
Make sure that the wire is in the parking position. The parking position is at the bottom left of the axes of movement of the wire.
5. moving the wire
In order to move the wire in the material it’s necessary to verify the specific parameters of Temperature and Speed for the chosen material, to do this select from the drop-down menu on the top left Setting > Parametres Material and take note of the parameters.

Fill in the parameters of Temperature and Speed, as previously noted, inside the Manual control panel.
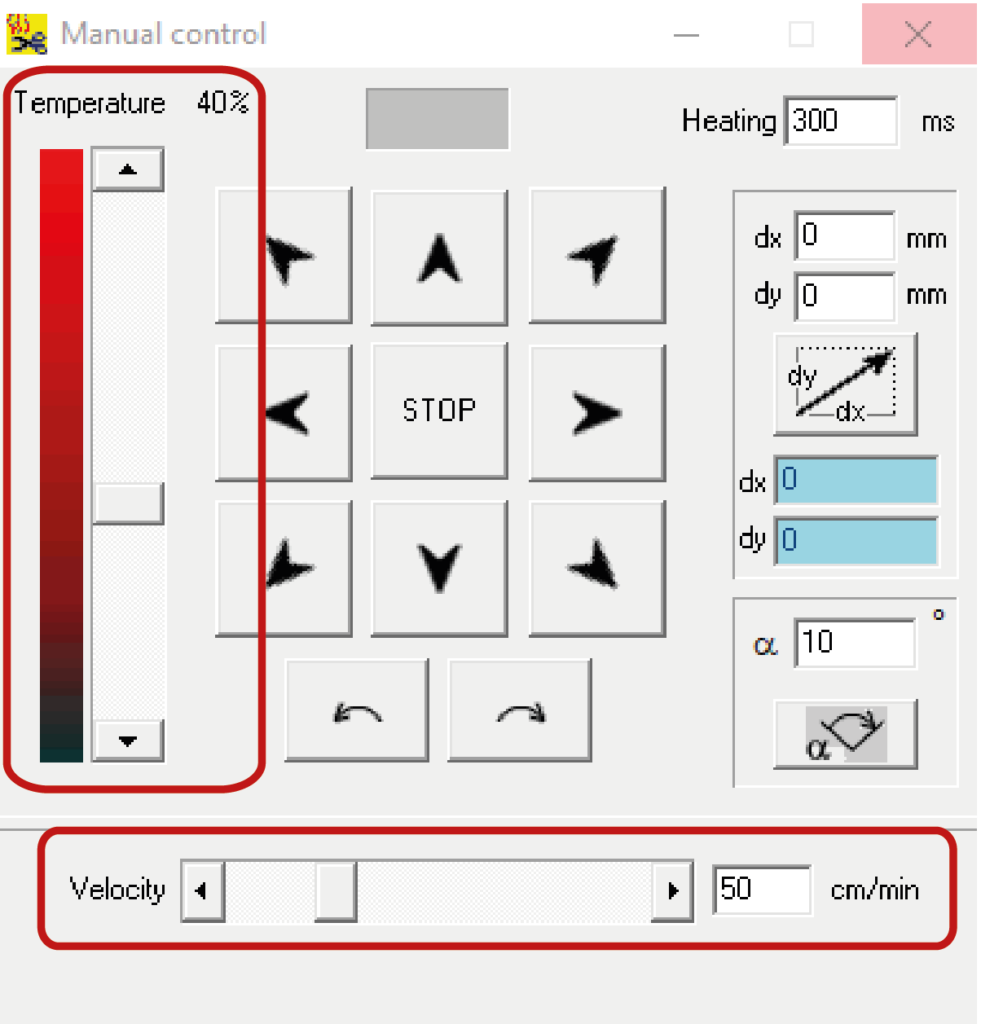
How to use the directional arrows: press and hold the left mouse button on the arrow until the desired position is reached, or right click on the arrow once, in this way the wire will move independently until the end of the travel.
During this automatic movement it’s possible to stop the progress of the wire by pressing the STOP button. If you allow the limit to be reached automatically, you will still need to press the STOP button to make the machine operational again.
If you want to move the wire of a defined measure, indicate its value in the dx and dy boxes (1) then confirm with the button (2)
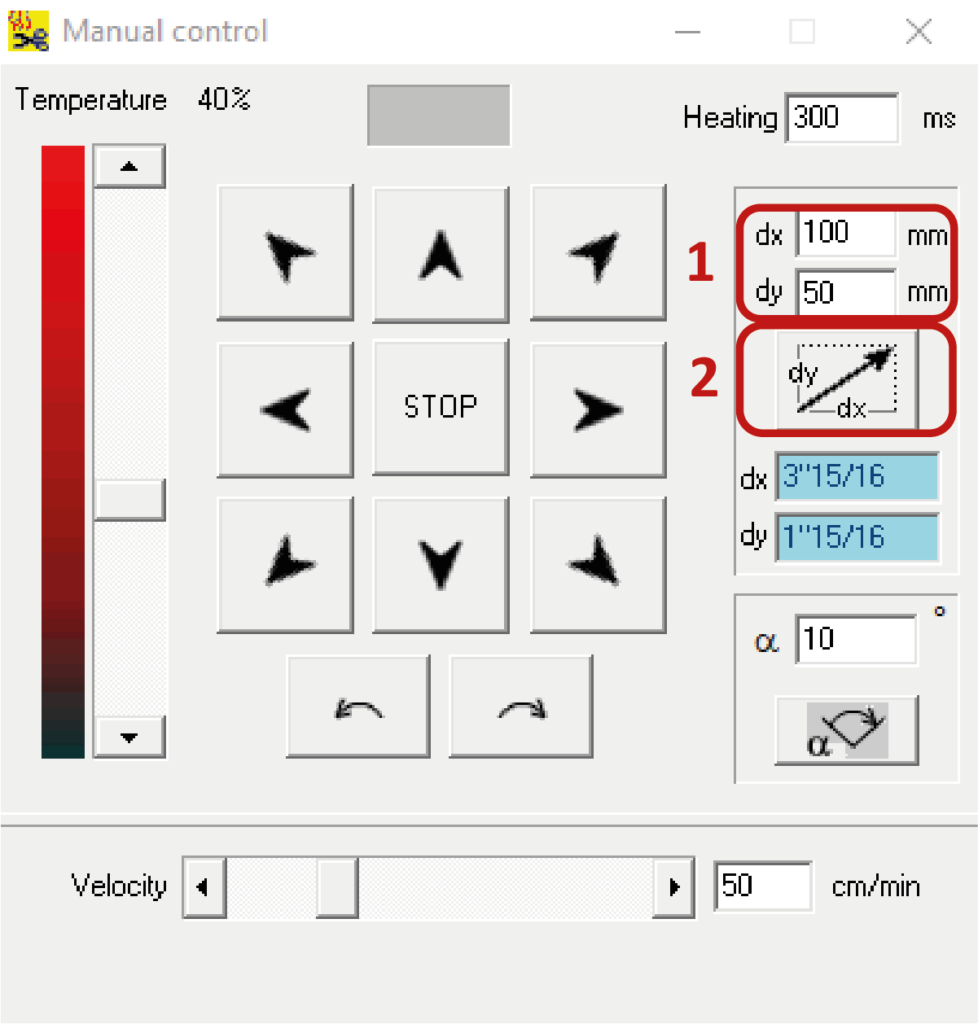
Insert positive values to move the wire up and to the right; negative values to move the wire down and to the left. The end of the travel, downwards on the vertical axis, is 1 cm from the plane of the machine.
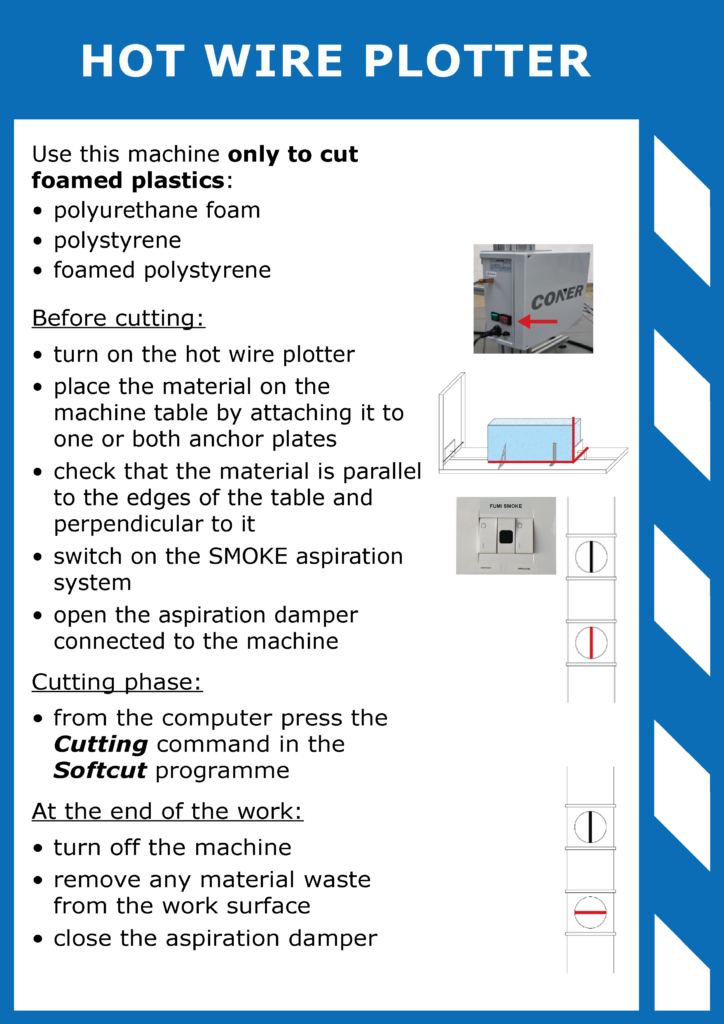
6. securing the material
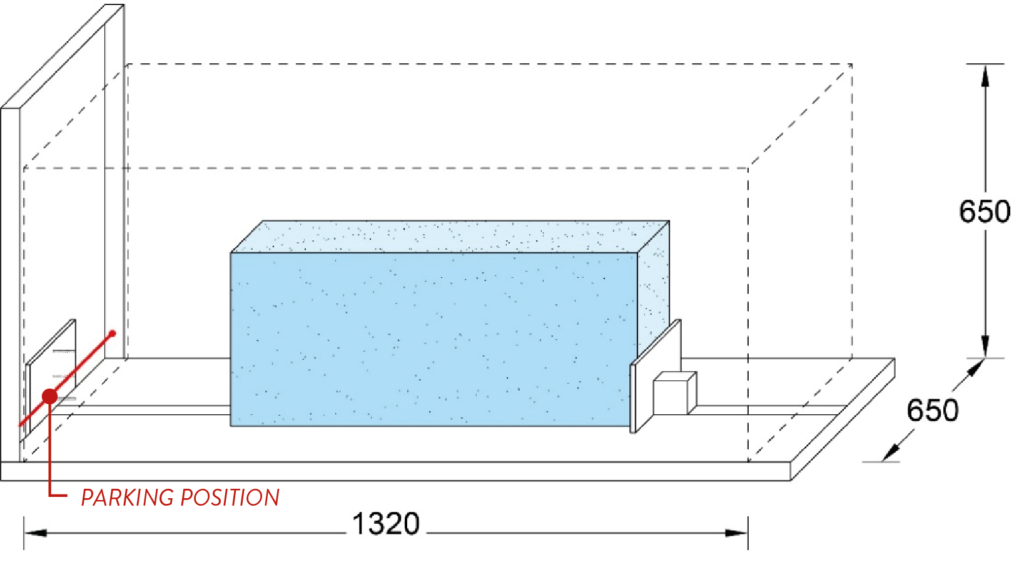
The maximum cutting area is 1320 mm x 650 x 650 h. Check that the material size doesn’t exceed these measurements. Place the foam material on the machine surface and secure it to one or both of the anchoring plates A and B. If the plate has a thickness of less than 30 mm it’s necessary to attach it to both plates to ensure its stability during cutting.
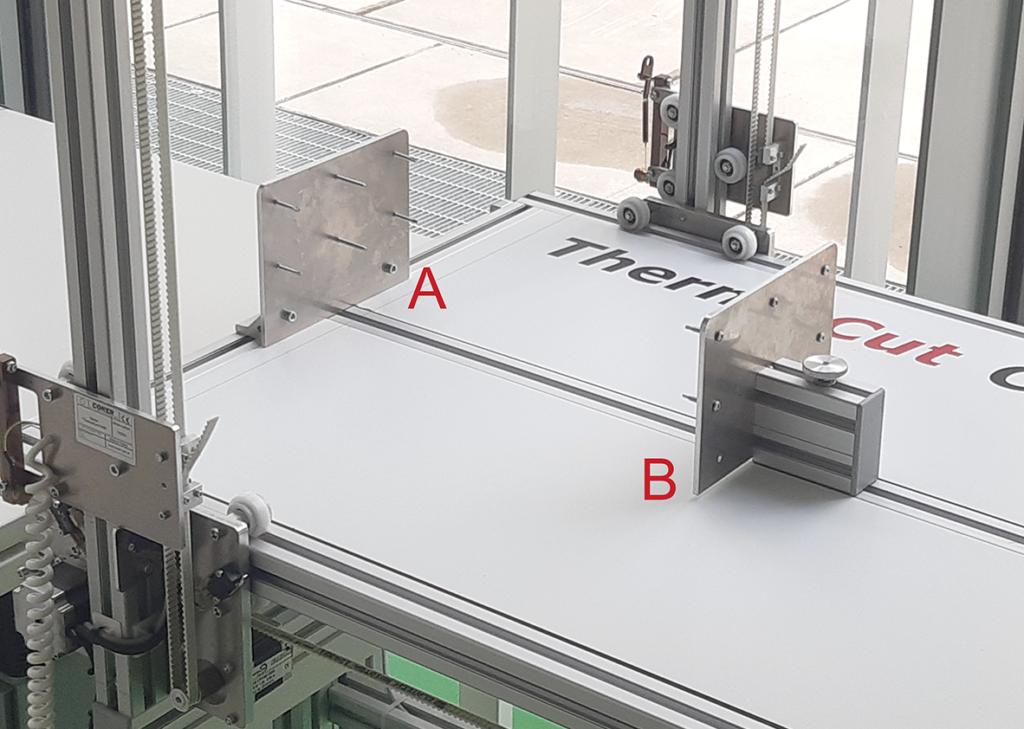
To obtain a good anchorage, insert the screws for at least 5-10 mm inside the block/slab. The left plate A is unmovable, the right plate B can slide horizontally along the plane of the machine, so it can be adapted to the size of the material. To move the anchor plate B, it’s necessary to loosen the screw placed on the support of the plate and, once you find the optimal position, tighten again. If the material has a thickness of ≥ 30 mm, it can be anchored only to the right plate B.
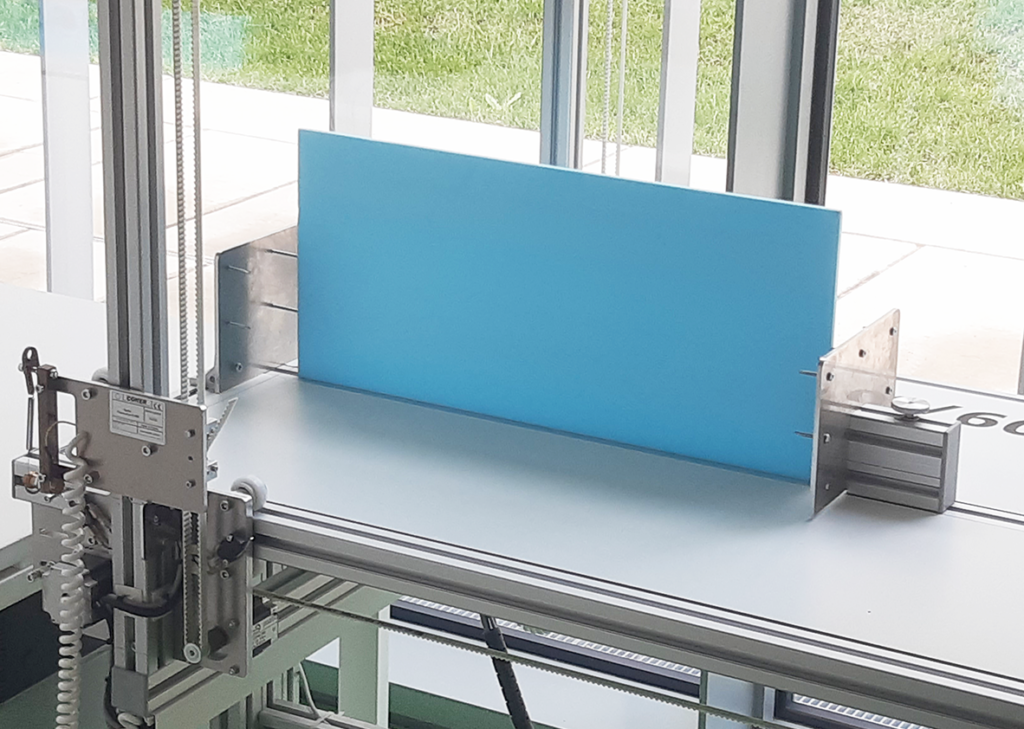
Anchor the sheet of material to the plate/plates checking that it’s perfectly perpendicular to the plane of the machine and parallel to the edges of the plane. To do this, use “L” metal squares or set squares; remove them before cutting.
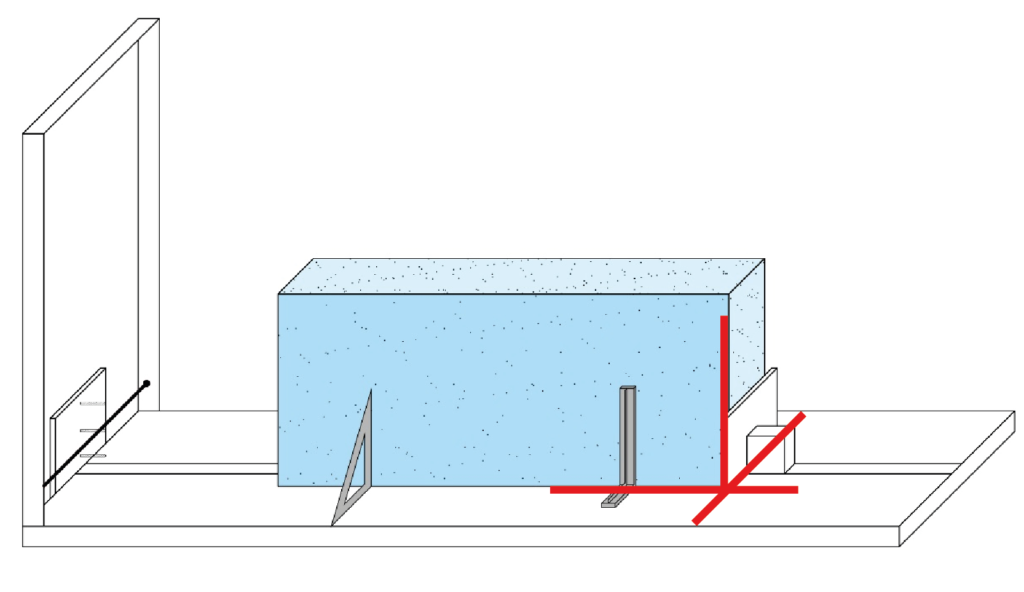
7. starting position of the wire
The starting position of the cutting path automatically generated by the software is at the bottom left.
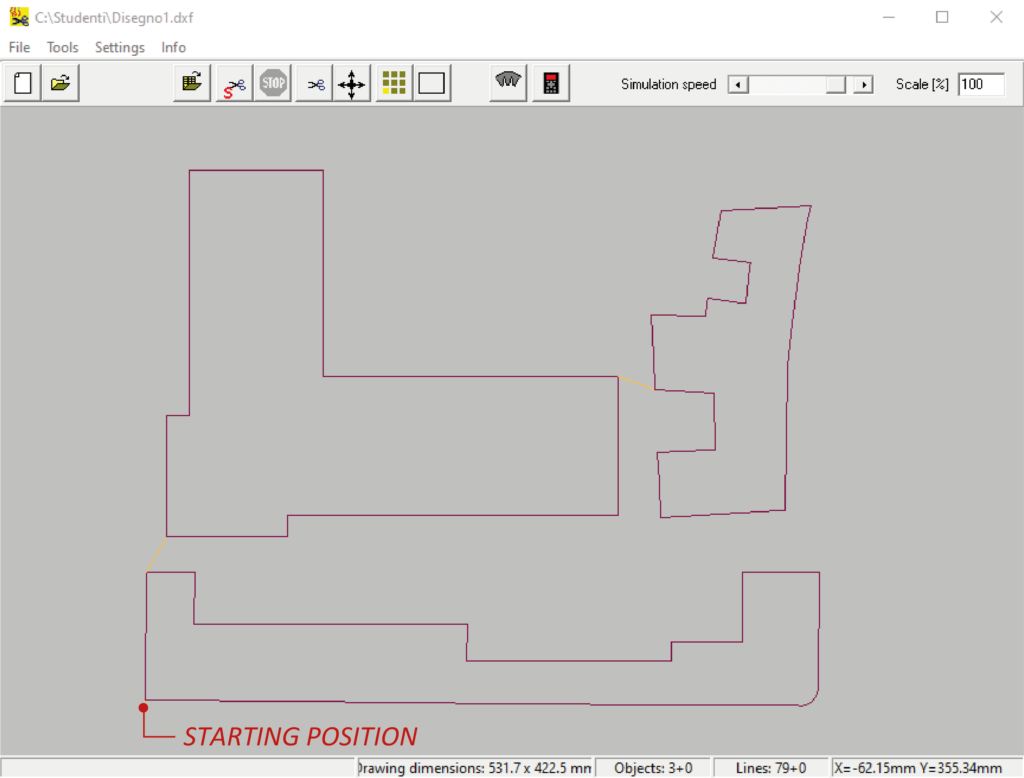
From the parking position make the first movement only horizontally for at least 20 mm, so that the wire doesn’t collide with the screws of the anchor plate. If the plate is fixed to the right plate only, continue with the advance of the wire, always horizontally, until it enters the material by about 5 mm.
8. turning on the fume extraction system
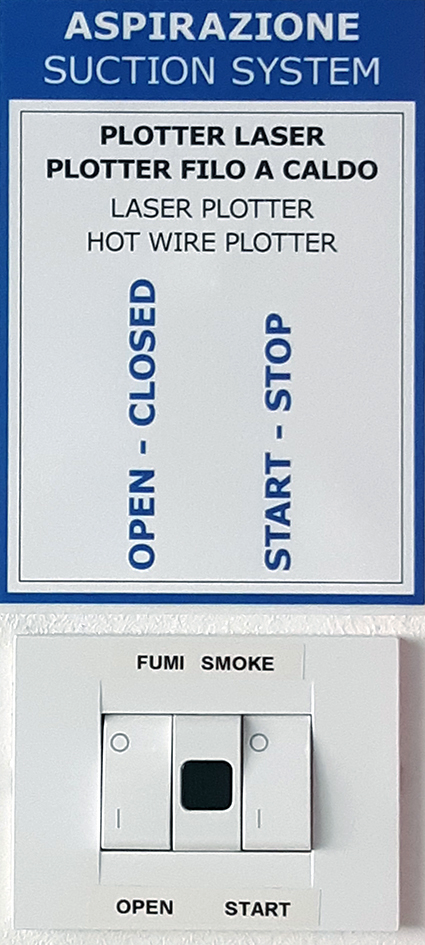
Before starting the cutting operations turn on the smoke extraction system or check that it is already turned on and open the suction damper of the hood above the hot wire cutter.
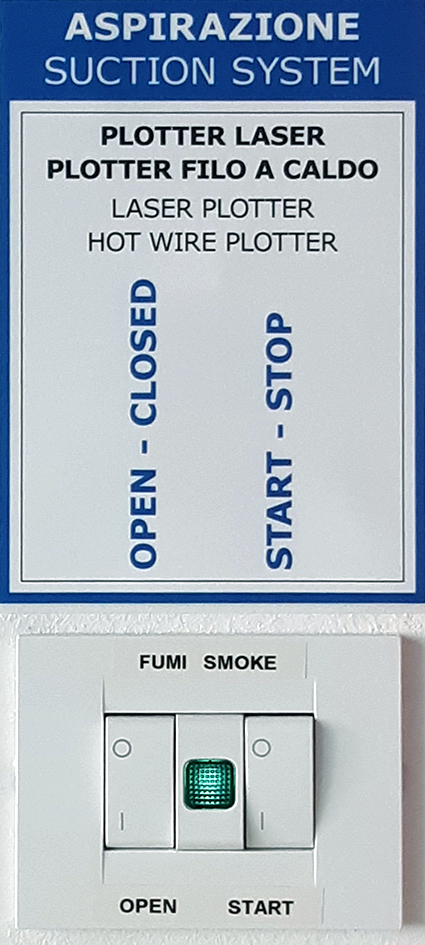
The wire plotter is equipped with a suction hood, to open the conduit turn only the lower damper placed on the exhaust pipe to the left of the entrance door, putting it in a vertical position.
9. cutting process

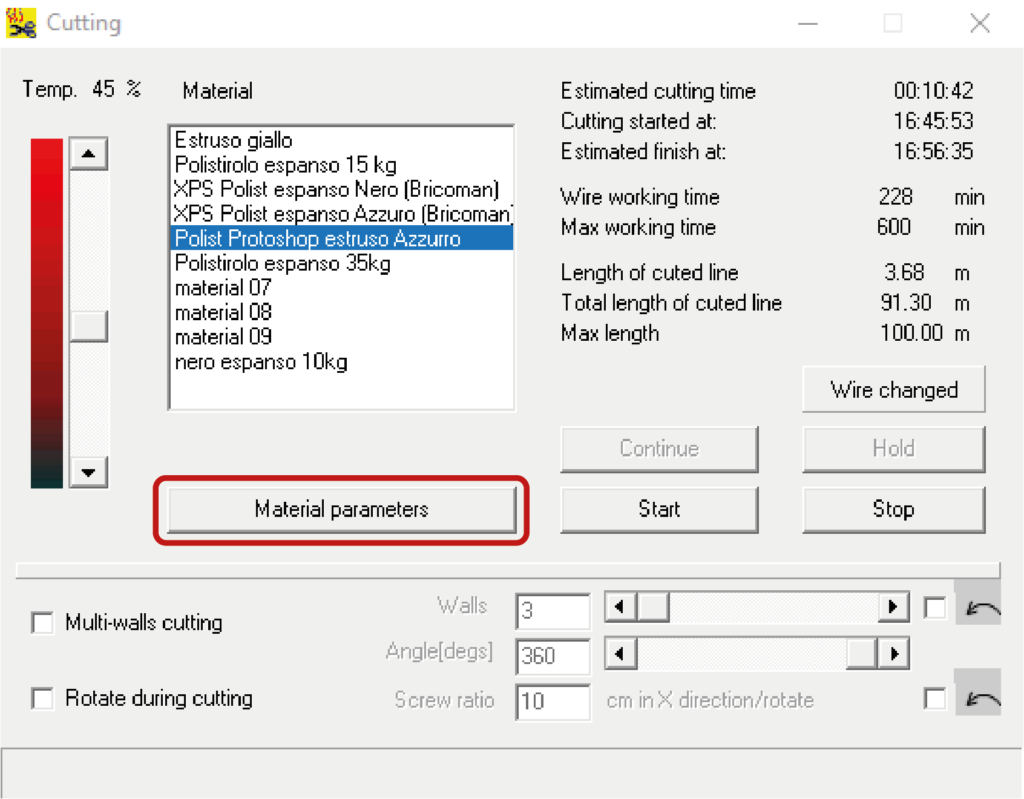
In the Cutting window select the material to cut in the Material column. If the material to be cut isn’t present in the library, ask the staff for support.
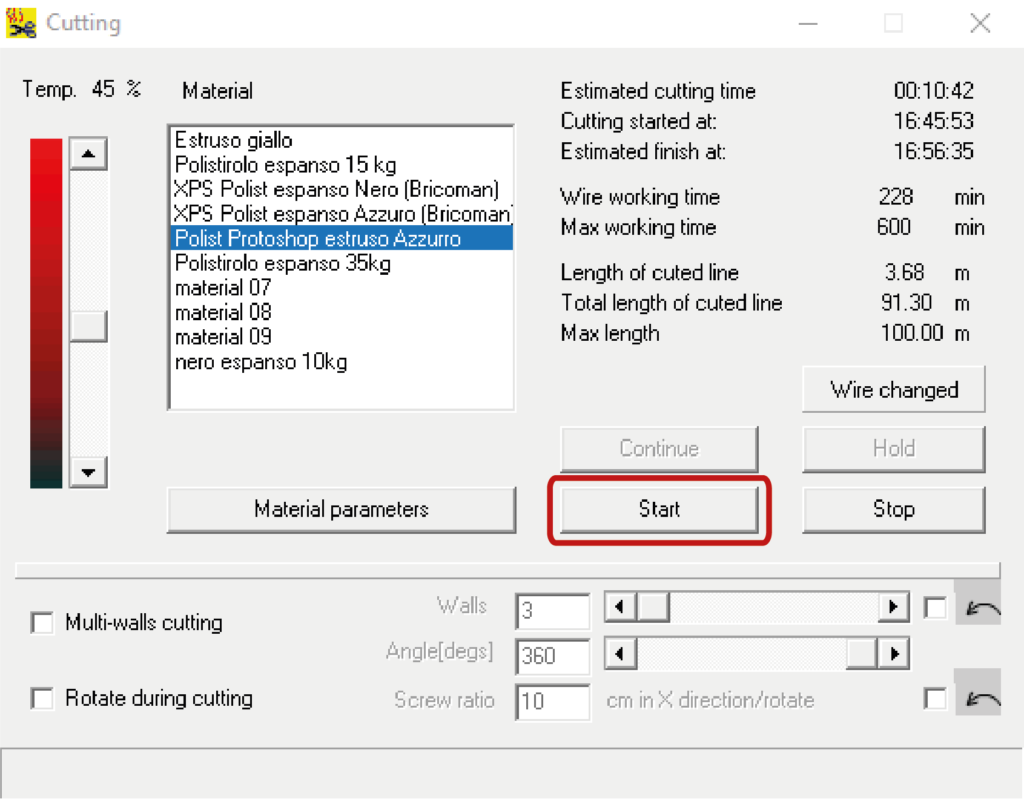
Click Start to start the cut.
DURING CUTTING REMAIN CLOSE TO THE MACHINE TO MONITOR ITS CORRECT OPERATION.
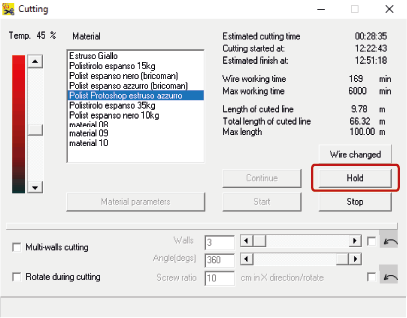
If you need to pause the machine during the cutting phase, click the Hold button in the Cutting window.
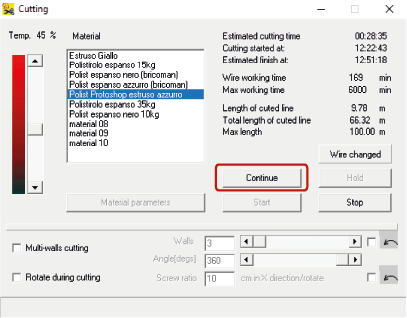
To resume cutting, click the Continue button.
10. at the end of the cut
Return the wire to the parking position, making sure not to collide with the screws of the anchor plates.
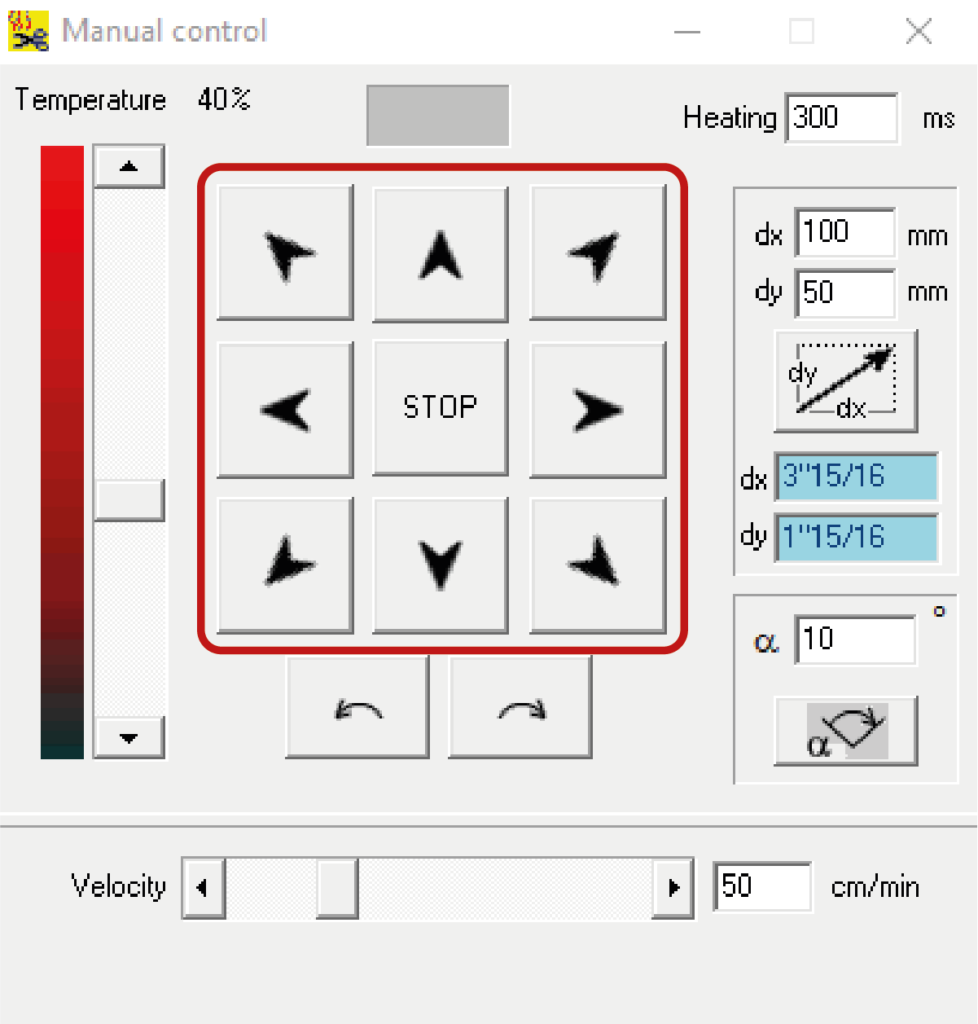
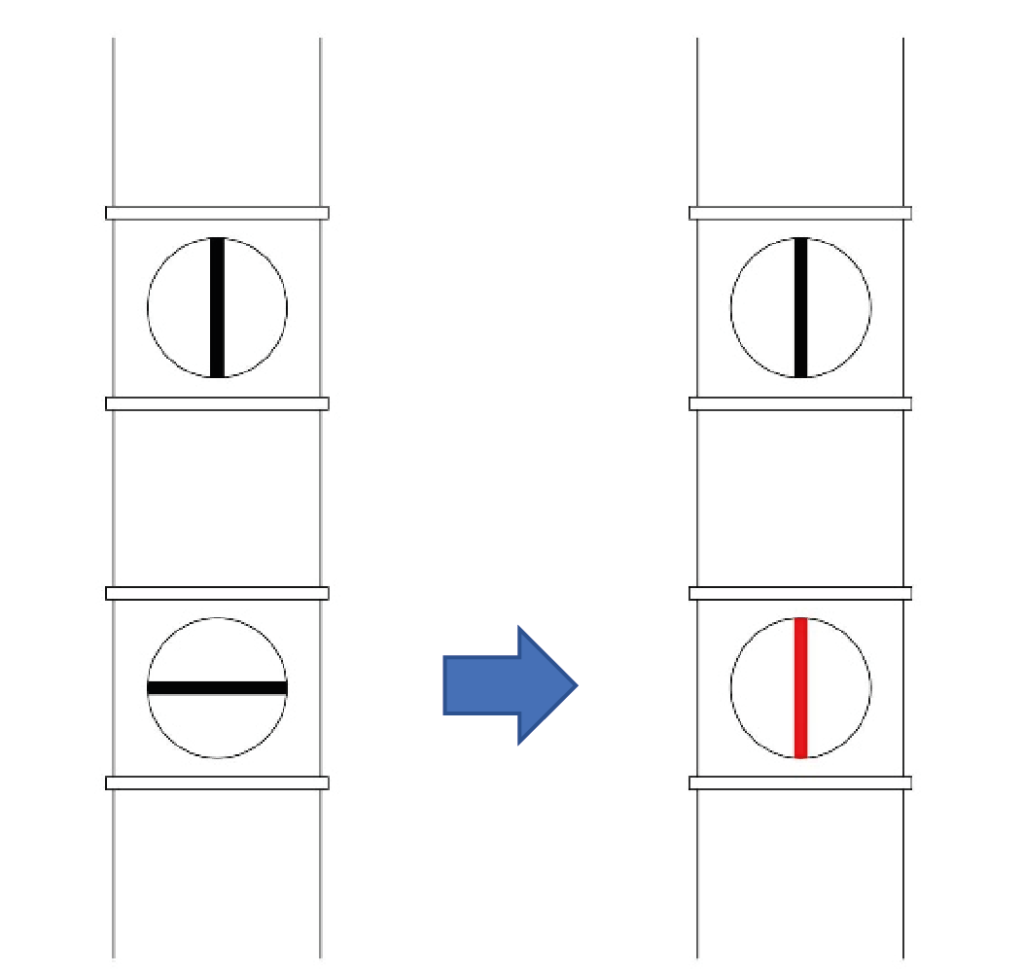
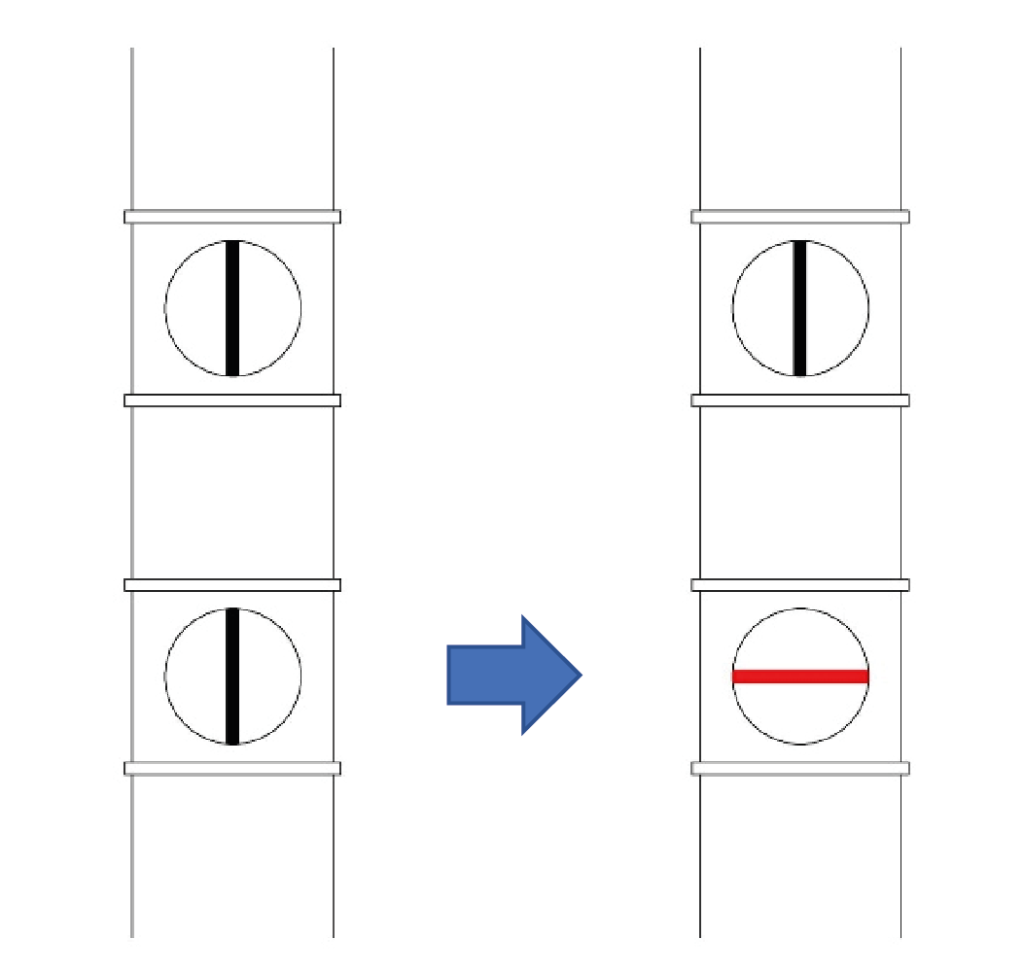
WIRE CLEANING: open the Manual Control window and set the temperature to 5%. Heat the wire by right-clicking on the arrows highlighted in the image below and wipe it with a piece of paper towel, then press the STOP button once cleaning is complete.
TOP CLEANING: remove residues from the top.
TURNING OFF THE MACHINE: press both switches on the control unit on the right side of the machine (as for turning on).
CLOSING THE DAMPER: close the lower damper placed on the exhaust pipe, putting it back in a horizontal position.
SWITCH OFF THE SUCTION SYSTEM: press in position O the two switches on the right of the CNC LAB door.
LEAVE THE SYSTEM TURNED ON BOTH SWITCHES IN POSITION “I” IF THERE ARE LASER PLOTTERS IN OPERATION IN THE CNC ROOM.
IN THE EVENT OF MACHINERY MALFUNCTIONING, TURN IT OFF AND CALL THE STAFF.
11. advanced settings – staff operators only
a. defining material cutting parameters
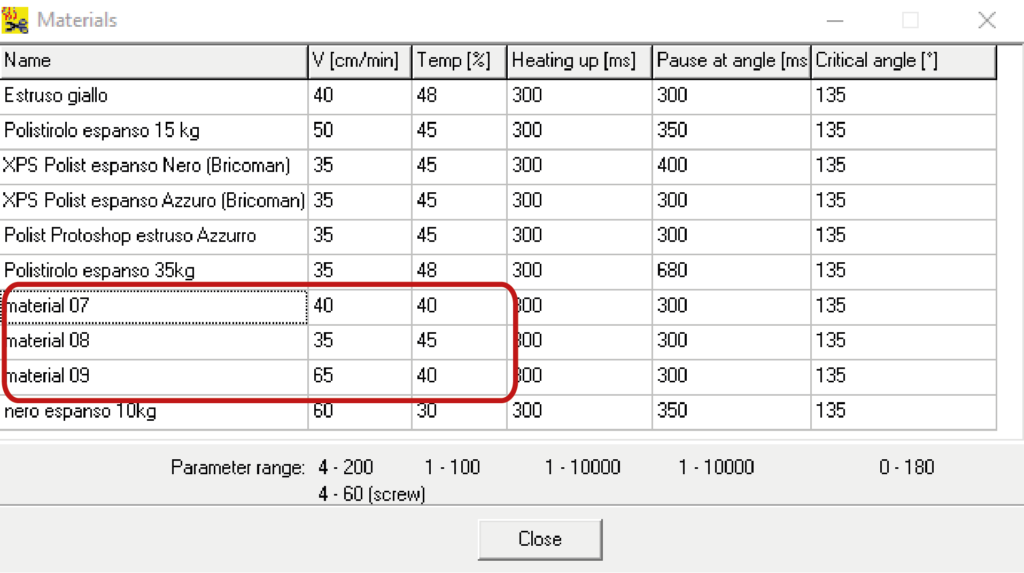
If the material to be cut is not present in the library, click on Material parameters in the Cutting window.
Select a generic material from the table and rename it, then change its Velocity V (cm/min) and Temperature Temp (%) parameters according to its density. The denser the material, the higher the temperature and the slower the speed.
- If, during cutting, the wire does not remain taut, the assigned cutting parameters are not correct for that type of material: try decreasing the speed and/or increasing the temperature;
- if, on the other hand, you notice that the cutting lines are too thick (≥ 1 mm), you should decrease the temperature and/or increase the speed;
- if the edges appear rounded, you can increase the Pause at angle parameter, which is set by default on 300 ms;
- if the Pause at angle parameter is too high, an excessively long pause in the corner creates a circular hole.
- if the material is of poor quality, it could have one or more directions in which the inconsistency of density generates a wavy cut instead of a straight one; in this case try to rotate the material by 90°.
b. configurating software parameters
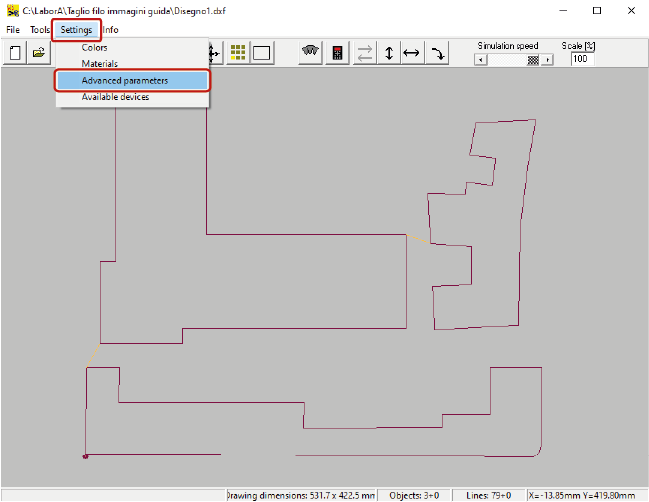
Select Setting > Advanced Parameters from the main menu:
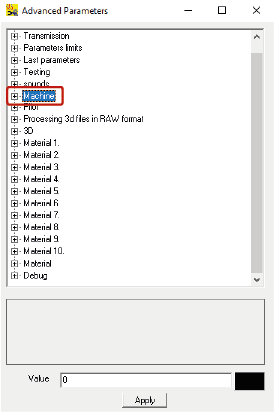
In the window choose the voice Machine
The starting point of the wire in relation to the imported drawing is managed with the variables Entry x and Entry y. If these variables are = 0 the starting point of the wire is at the lower left corner of the imported drawing. In order to move the starting point relative to the drawing, it is possible to assign a negative value to both Entry x and Entry y; for example, assigning the values of Entry x=-20 and -Entry y=0, the cut will begin at a distance of 20 mm from the drawing.
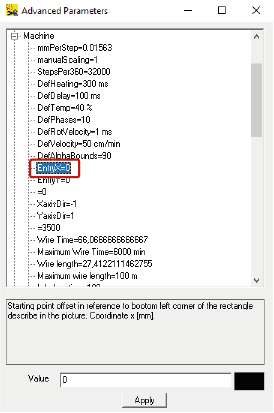
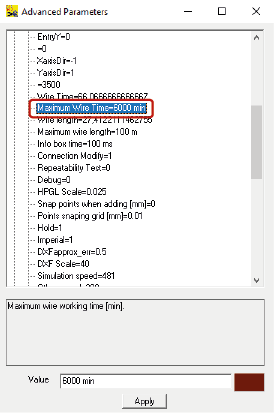
The maximum wire usage time in minutes is managed by the variable Maximum Wire Time. When this time expires, the software will display an alert window requesting the wire to be replaced.
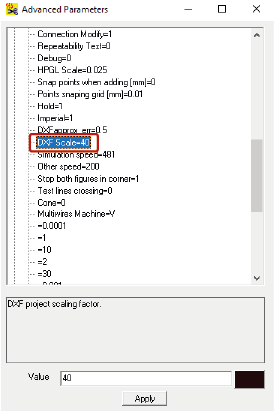
The scale for importing DXF files is managed by the variable DXF Scale. To import drawings at the correct scale in millimetre units, this scale must be =40
c. replacing the wire
When the wire is very worn, it acquires a whitish colour and must be replaced.
The spool of wire is located in the CS1 drawer in the CNC Lab, dismantle the deteriorated wire by untying it from both spring eyelets and use it as a measure to determine the length of the new wire.
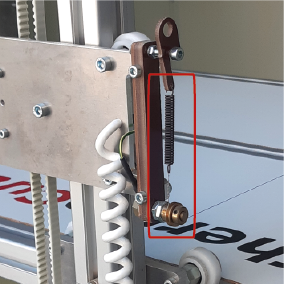
Tie the wire to the eyelet of the first spring, pass it through the slots of the two circular brass guides and hook it to the eyelet of the second spring, holding it taut.
d. changing the end stop of the wire on the x-axis
The end stop of the wire on the x-axis of the bridge to which the wire is anchored to, is determined by a physical stop placed on the bridge’s sliding track.
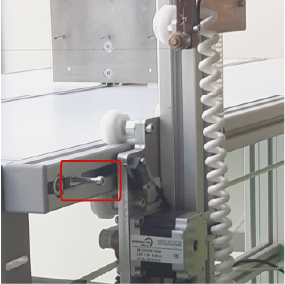
It is therefore possible to change the parking position of the wire by loosening the Allen screw and moving the stop.
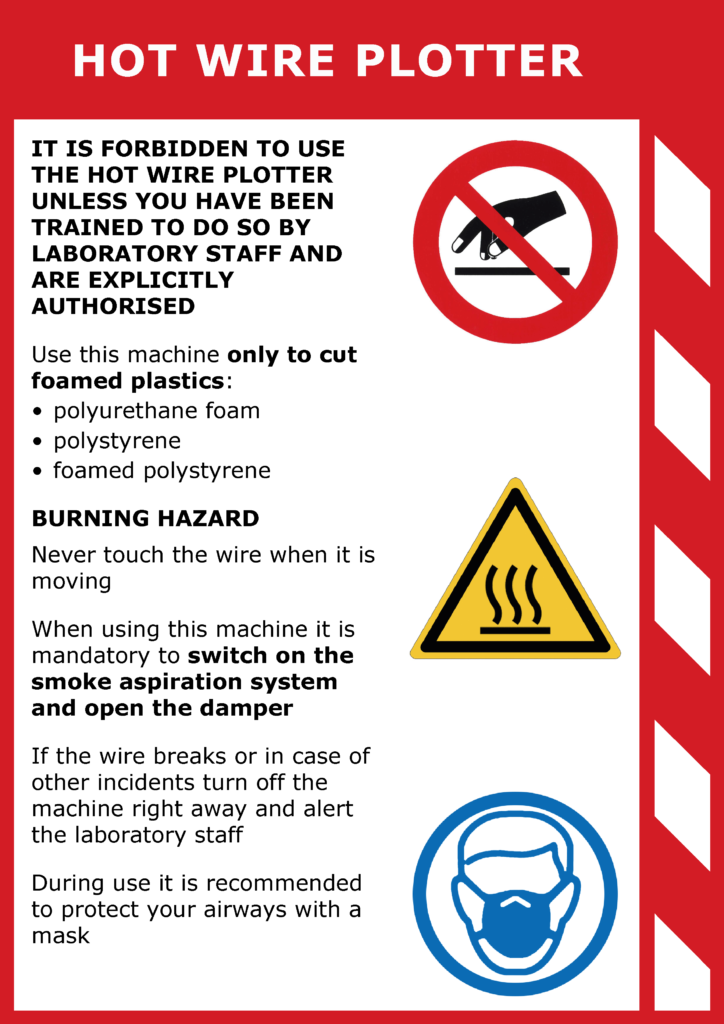
12. prohibitions and regulations
13. machine sheet