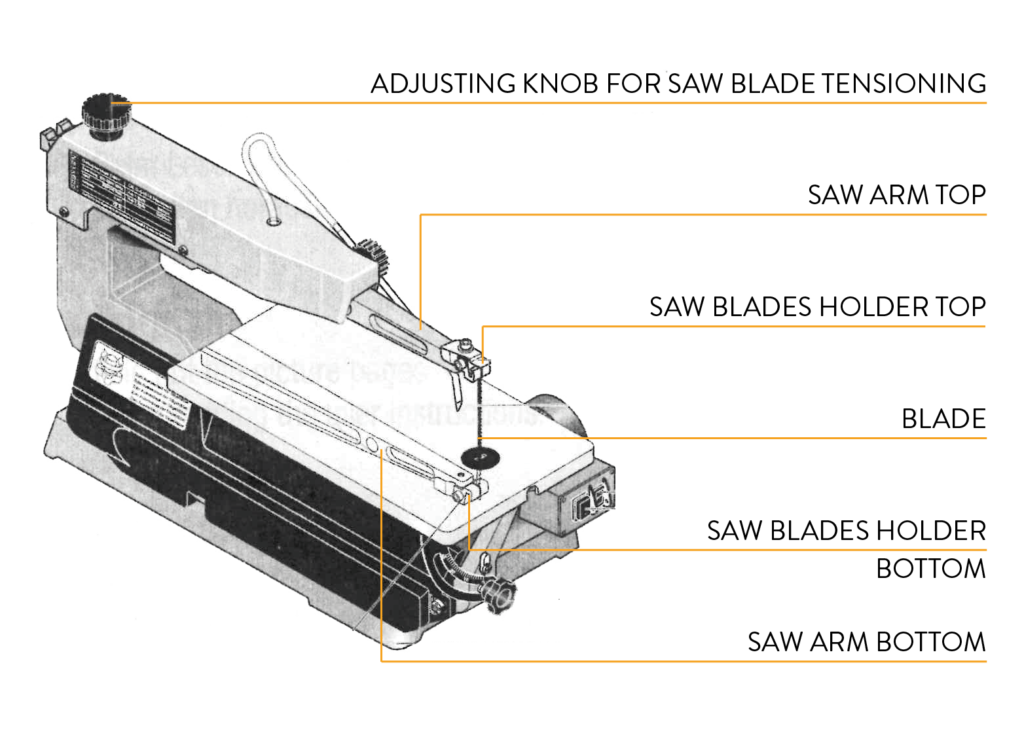
use of the scroll saw
1. before starting the scroll saw
Read carefully the signage displayed in the DRILLING lab.
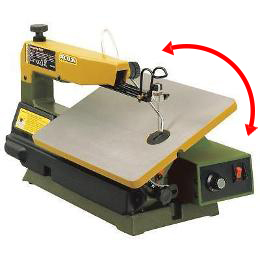
Check the integrity of the blade. If necessary, change the standard layout of the scroll saw, changing the inclination of the plane and/or fixing any guides.
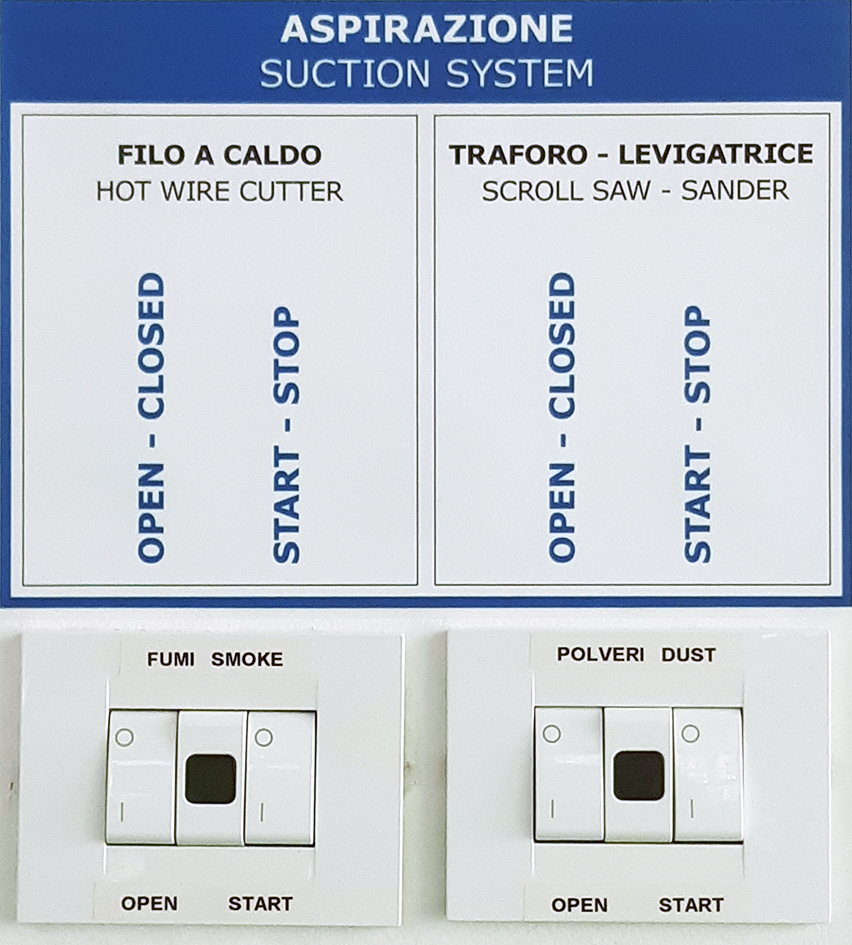
Turn on or verify that the dust extraction system is active: switches, OPEN and START, in position I and wait for the green light to turn on.
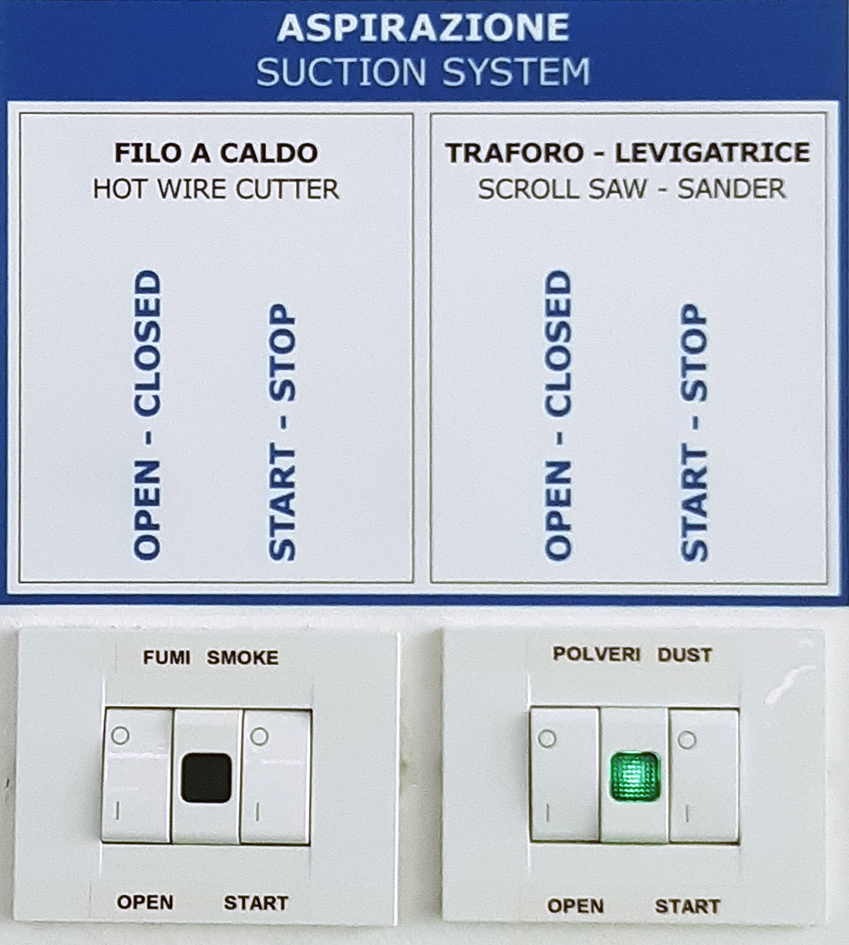
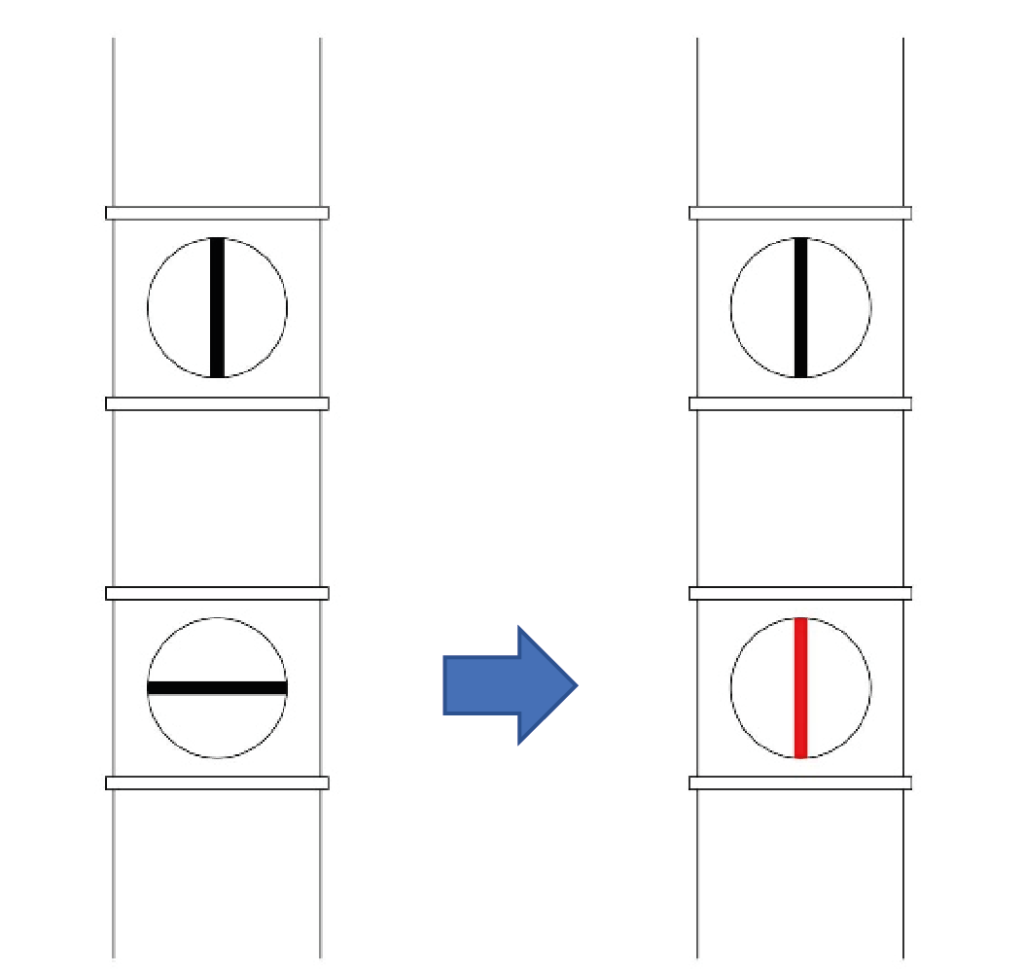
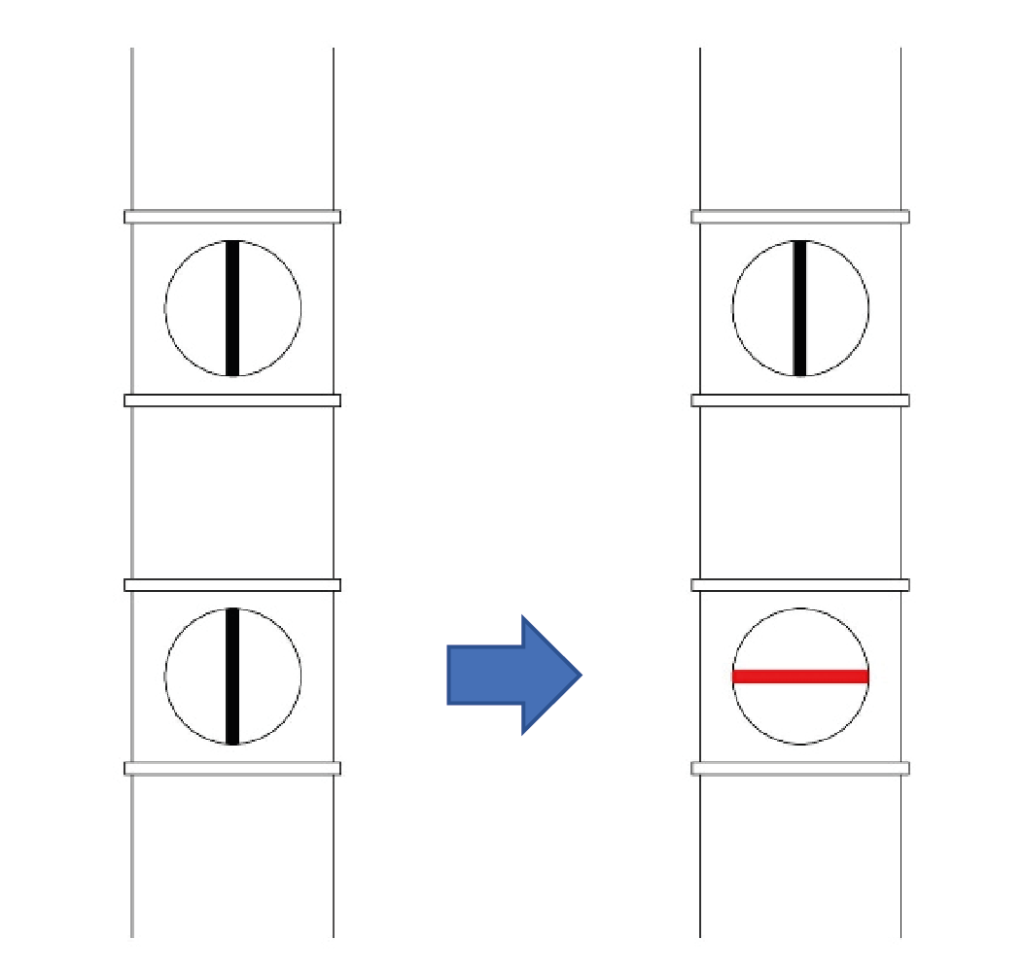
Open the lower damper, placed on the suction pipe, in correspondence of the machine that you intend to use, rotating it in vertical position.
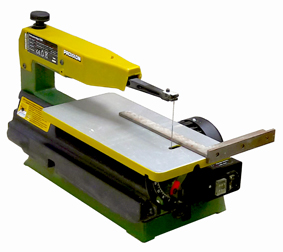
The flexible suction pipe must be positioned in the rear part of the scroll saw at the suction nozzle or near the machine surface, in order to intercept as much dust as possible.
2. ignition of scroll saw
To operate the blade oscillation, press the ON/OFF (I/O) switch, on the front of the right side of the machine.
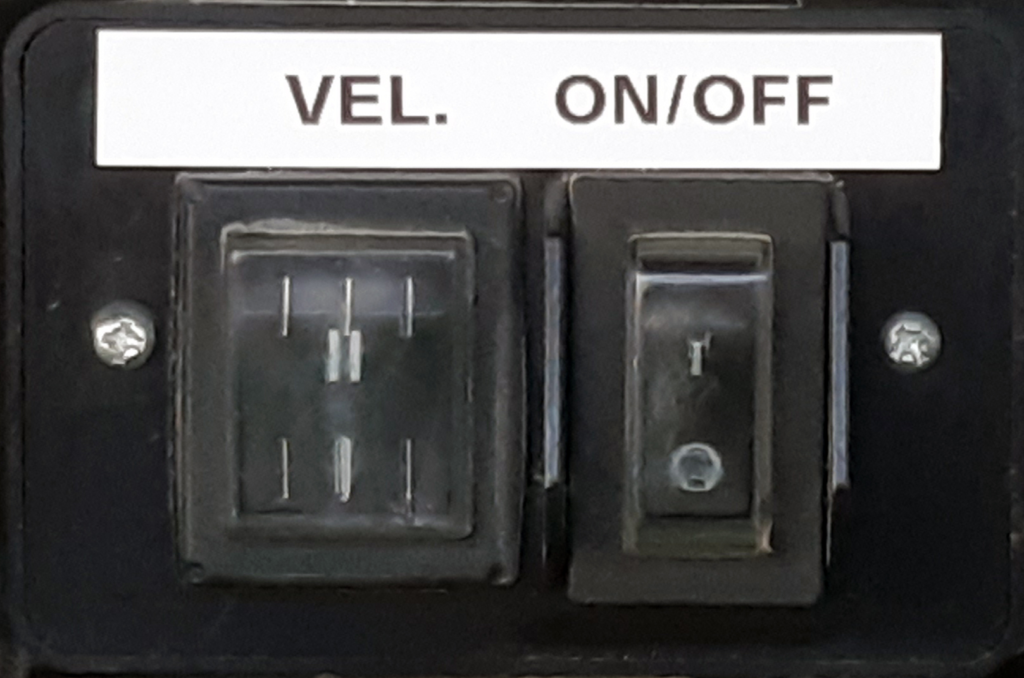
The switch to the left of the ON/OFF ignition allows to vary the oscillation speed of the blade, which, for woodworking, must be in position I (slower) to allow the teeth of the blade to saw the wood with greater accuracy.
3. cutting of wood and wood-Based Materials
The electric scroll saw is normally used for the cutting of solid wood tablets and slabs of wood derivatives such as plywood, multilayered wood, chipboard and mdf. To cut, push the piece against the saw blade holding it firmly with both hands. At the same time, press the workpiece against the work surface to prevent the blade teeth from lifting it, with the risk of breaking the blade itself.
The higher the thickness of the material (max 5 cm), the more it will be necessary to proceed slowly.
On the tablet draw the outline of the pieces to be made or apply paper templates with removable double-sided adhesive and cut along the perimeter. The blade cut leaves an uneven surface and can be inaccurate, being driven manually; for this reason, cut at a distance of about 1 mm from the contour and, subsequently, use the sander to finish the piece and bring it to the correct size.
If you need to cut shapes with curves greater than 10 mm radius, you can rotate the board slowly as you advance.
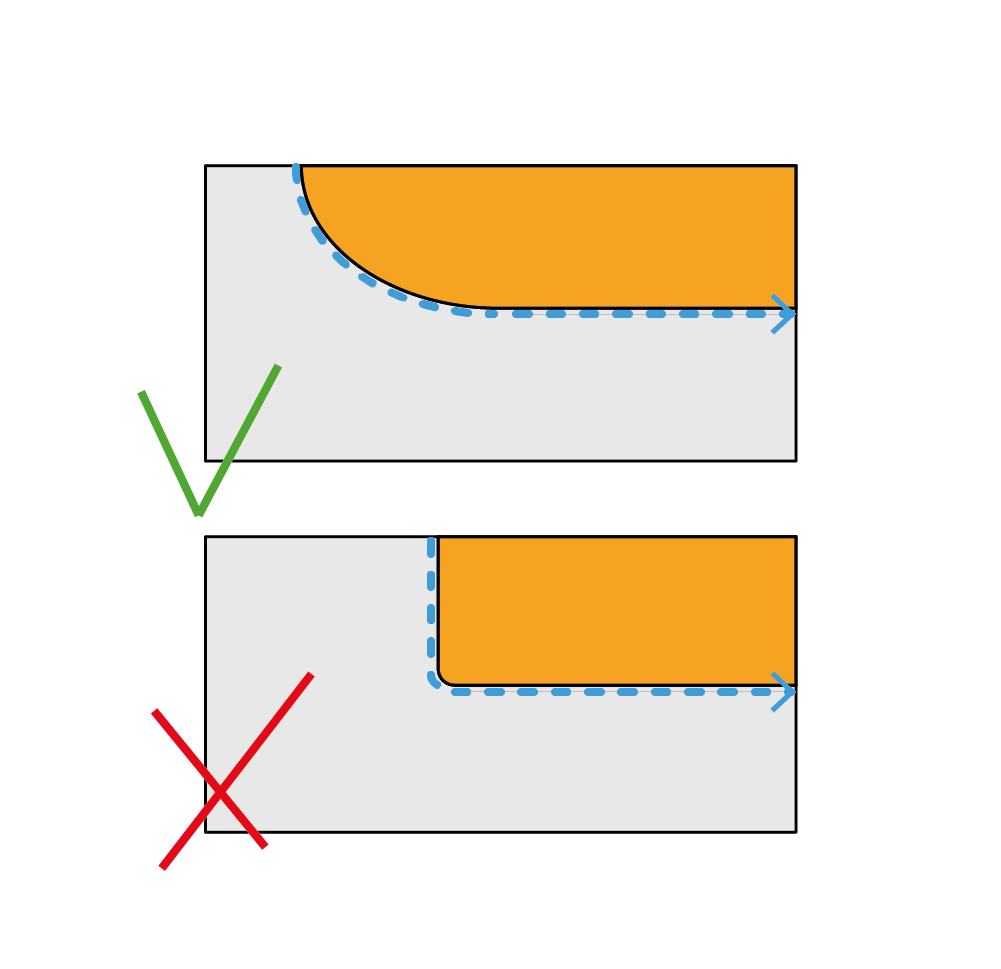
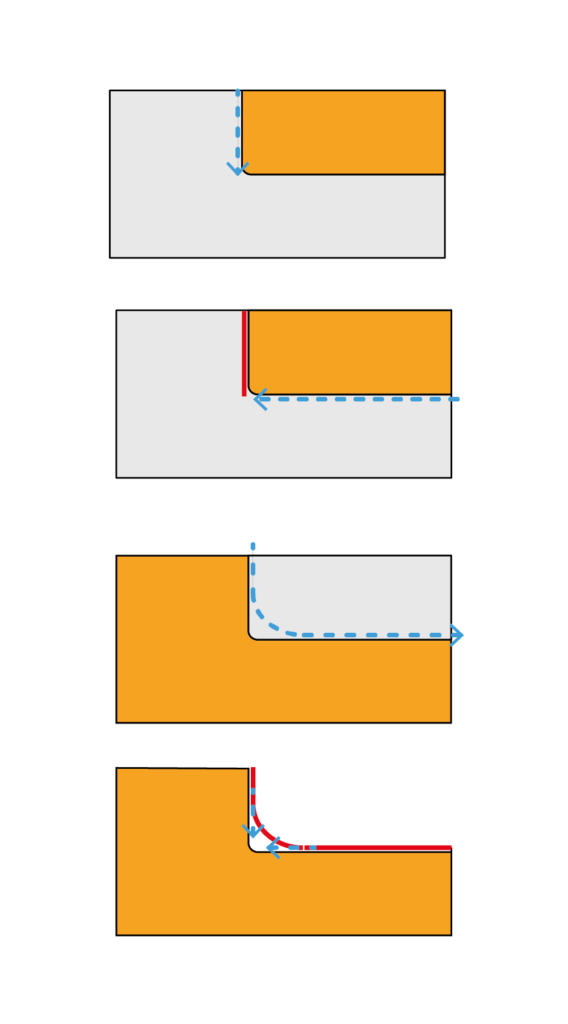
If the workpiece has curves of less than 10 mm radius: in the case of external corners, first cut the shape with the edges on and then make the chamfer by sanding them; if the workpiece has a chamfer in internal corners, make a first cut with a wider curvature and then go to finish the inner corner first with the scroll saw, then manually with a file from wood of cylindrical section.
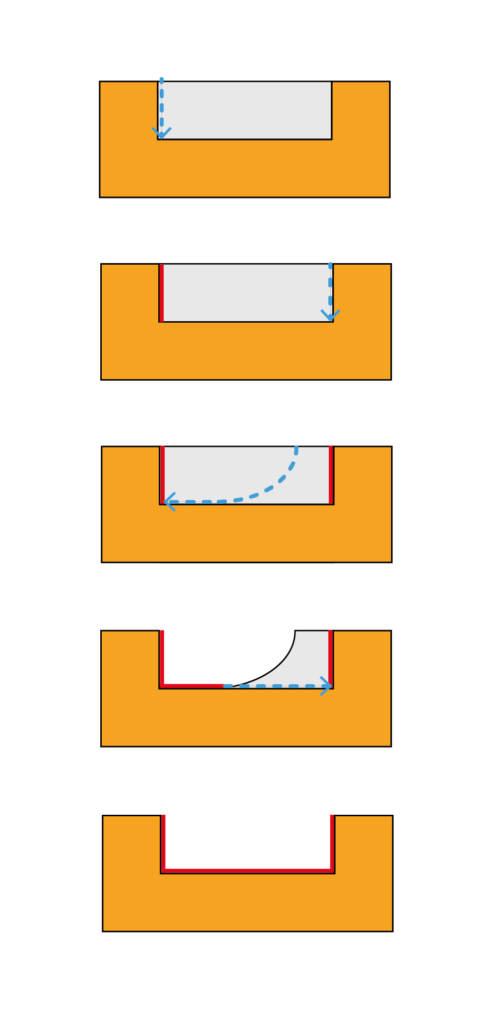
To create a U-shape: cut to an inner edge; with the blade still moving, remove it by moving the piece backwards along the same path, always holding it firmly. Make a similar cut to reach the second edge. Then make a curved cut to reach the side orthogonal to the two previously cut and stop at the edge; turn off the scroll saw and remove the scrap piece. Turn the scroll saw back on and complete the cut of the orthogonal side.
To make internal holes in one piece, it is necessary to drill it with a tip of at least 6 mm in diameter and insert the blade into the hole.
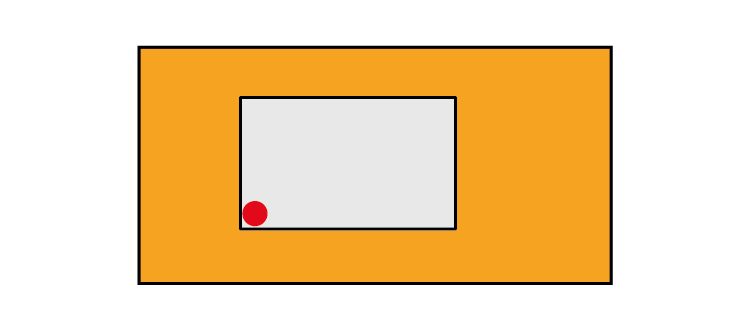
When the machine is off, turn the blade tension adjustment knob counterclockwise. Keep the top saw arm down and remove the blade from the blade holder. Insert the blade into the hole in the workpiece, making sure not to remove it from the blade holder of the lower saw arm (which is located under the work surface of the tunnel). Insert the blade back into the upper blade holder and adjust the tension. Cut the hole and then remove the piece following the instructions above.
4. at the end of work
SCROLL SAW SHUTDOWN: Press the switch in the OFF position and never move away from the workstation leaving the machine running.
RESTORING THE STANDARD CONFIGURATION: Leave the scroll saw worktop in horizontal position and remove any guides.
CLEANING OF THE WORKSPACE: remove the wood waste and throw them in the appropriate container; using the pipe coolant, aspirate the residual dust on the scroll saw and in the surrounding area.
SUCTION INTERRUPTION: close the lower damper, placed on the suction pipe, in correspondence of the machine that has been used, rotating it in horizontal position.
SWITCHING OFF THE EXTRACTION SYSTEM: Put the two OPEN and START switches of the dust extraction back in O position.
LEAVE THE SYSTEM ACTIVE IF OTHER SCROLL SAW OR SANDERS ARE IN OPERATION.
helpful tips
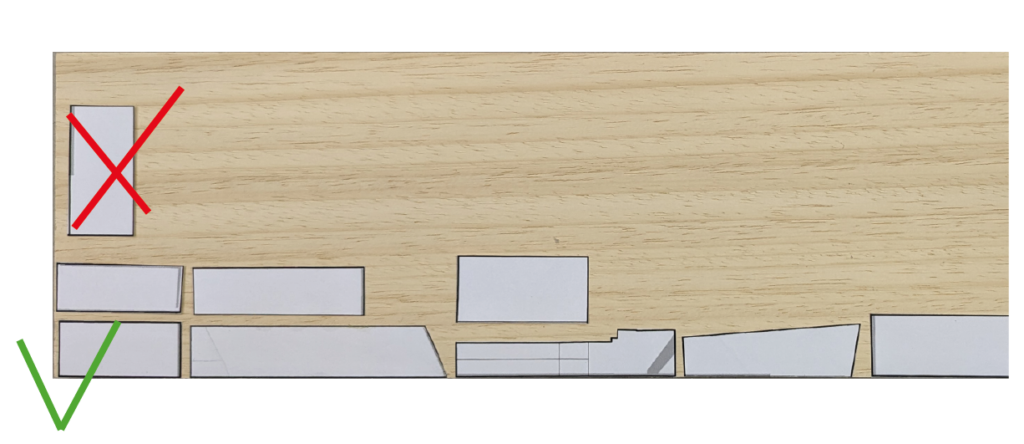
For a better aesthetic performance and a greater resistance of the piece, apply or draw on the tablet the outline of the shapes to be cut with the long side parallel to the wood grain.
If the pieces to realize are numerous, it is advisable to cut the shapes from a printed drawing in scale and apply them on the tablet with removable double-sided roller at a reciprocal distance of 2 or 3 mm in order to allow the passage of the blade and to optimize the number of cuts to be made.
If the tablet has straight and smooth edges, it is advisable to apply the shapes adhering to the edges of the tablet so that you do not have to sand them later.
To reduce the thickness of a tablet by planning it is necessary to keep in mind that it must have a length of about 30 cm; also, for this reason we suggest the positioning of the silhouettes mainly aligning them along the larger side of the board.
To make straight cuts it is advisable to mount a guide on the work surface of the tunnel.
To make curvilinear cuts, reduce the thrust of the workpiece against the blade to avoid its torsion or breakage; also, during cutting, verify that the blade remains perpendicular to the work surface and, at the end of the curve, release the pressure of the workpiece on the table, to allow the blade to return to the orthogonal position.
with the scroll saw it is possible to cut
- soft solid wood such as: obece, dried linden and balsa, up to a maximum thickness of 50 mm;
- solid hardwood such as: walnut, beech and mahogany, up to a maximum thickness of 30 mm;
- mdf panels up to a maximum thickness of 30 mm;
- plywood panels up to a thickness of 20 mm;
- sheet plastics such as: forex, methacrylate and polycarbonate up to a thickness of 10 mm;
- profiles for modelling in: wood, plastics, aluminium, brass and copper.
it is not possible to cut
- expanded plastic materials;
- profiles and plates of steel and ferrous metals;
- sheets of glass, plaster, cement and stone.
prohibitions and regulations